Feeds RSS

sponsored

Your Ad Here
Showing posts with label Cisco Tips. Show all posts

Friday, 3 July 2009

Troubleshoot Cisco routers and switches using the debug commands

What makes Cisco IOS Debug commands so useful?

Cisco IOS Show commands can tell you many things about what is going on with your router or switch, but they can’t tell you everything. For example, Show commands cannot tell you when routes drop in or out of the routing table, why an ISDN line failed to connect, whether a packet really went out the router, or what ICMP error code was received. On the other hand, Cisco IOS Debug commands can tell you all these things, and more.

Besides providing more detailed information than what Show commands can provide, Debug commands have the benefit of providing information in “real time” (or dynamically). This is contrary to Show commands that just take a snapshot in time and display the results on your console (somewhat static results). This real-time difference can be very helpful in diagnosing problems.

How do I use Debug commands?

Let’s take a look at a simple example. We are going to view RIP (Routing Information Protocol) in Debug mode.

Router# debug ip RIP
RIP protocol debugging is on

To verify what debugging is enabled, use this command:

Router# show debug
  RIP protocol debugging is on

The output from whatever type of debug is enabled will be sent to wherever the Cisco IOS logging system tells that output to go. Either you will receive the output on your screen, it will go to the buffered log on the router, or it will go to a syslog server across the network (or all of these).

To see what level the various outputs are set to and where the output will go, type:

Router# show logging
Syslog logging: enabled (1 messages dropped, 3 messages rate-limited,
                0 flushes, 0 overruns, xml disabled, filtering disabled)
    Console logging: level debugging, 8 messages logged, xml disabled,
                     filtering disabled
    Monitor logging: level debugging, 0 messages logged, xml disabled,
                     filtering disabled
    Buffer logging: level warnings, 2 messages logged, xml disabled,
                    filtering disabled
    Logging Exception size (4096 bytes)
    Count and timestamp logging messages: disabled
    Trap logging: level informational, 12 message lines logged
Log Buffer (51200 bytes):
*Jun  9 20:56:49.195: %LINK-3-UPDOWN: Interface FastEthernet0/0, changed state to up
*Jun  9 20:56:49.231: %LINK-3-UPDOWN: Interface FastEthernet0/1, changed state to up
Router#

The console should display RIP updates that are sent and received through the RIP protocol. Here is an example of what you might see for RIP debugging:

*Jun  9 21:13:56.471: RIP: sending v1 update to 255.255.255.255 via FastEthernet0/0 (1.1.1.1)
*Jun  9 21:13:56.471: RIP: build update entries - suppressing null update
*Jun  9 21:14:22.519: RIP: sending v1 update to 255.255.255.255 via FastEthernet0/0 (1.1.1.1)
*Jun  9 21:14:22.519: RIP: build update entries - suppressing null update

Remember that you should use Debug only for a short time to get a snippet of information, and then turn Debug off as it can be a serious performance hit on your router.

There are several commands for turning off Debug. You could type undebug all or a precreated alias, un all (for more information on aliases, see my article “Enter Commands More Efficiently with Cisco Command Aliases“), but the no debug command works fine also.

Router# no debug

If you type debug ?, you will see that there are over 200+ Debug commands, and each of those has many options. Debugging RIP is just a very simple example.

What are the three most common mistakes made when using Debug?

Using Debug can be a risky proposition, and even experienced admins have made mistakes when using it.

I’d say the number one common mistake is to forget that you have left Debug on in a production environment. Sometimes, we get so focused on resolving the issue that when we get it resolved, we are on to the next “opportunity” and forget to issue the no debug command to turn off debugging. I think that many a network admin can attest to horror stories of when they brought their router to its knees because they forgot this simple task of turning off Debug.

The second common mistake would be not realizing the effect on your router of issuing a lot of Debug commands at the same time. Remember that the router’s job is to forward packets, not to monitor processes and generate Debug messages. For example, you are having a problem with the packets on your router, so you issue the Debug statement debug ip packet. Then you decide that you want to view the events on the RIP protocol. Now, you have two separate Debug statements that are being processed and sent to the console. Debug statements are processed at a higher priority than other network traffic, so, needless to say, these Debug statements can jeopardize your router’s performance.

The third common mistake made with the Debug command is entering debug all or debug ip packet detail on a production router. Either one of these commands can crash a heavily loaded production router. Luckily, there is an “are you sure” prompt before these take effect; however, that hasn’t prevented every debug-related catastrophe. You should be as specific as possible when using Debug, and then turn it off as quickly as possible. Also, always test your Debug commands on a test router before using them in a production environment.

Posted By David Davis

Get to know the Cisco IOS Feature Navigator

What is the Cisco Feature Navigator?

This recently improved Cisco IOS Feature Navigator is set up to easily research and display available features in a certain version of the IOS, in a certain hardware platform, or working backward from features to IOS.

As the name implies, the Feature Navigator allows you to navigate through some simple screens to retrieve information on your Cisco IOS, IOS XE, and CatOS software releases. This is a free tool and a great resource that can save a network admin a lot of time and frustration.

With the Feature Navigator, you can easily research your Cisco IOS software for compatibility with other images, research software releases, and search for a particular feature. It even gives you an option to display the details on any feature that you pick.

How can the Cisco IOS Feature Navigator help me?

We are going to look at five different scenarios to show you how the Feature Navigator

can assist you in gaining additional information about your IOS.

Scenario 1: Display features for a particular IOS

Let’s see how easy it is to display features that are available for a particular image.

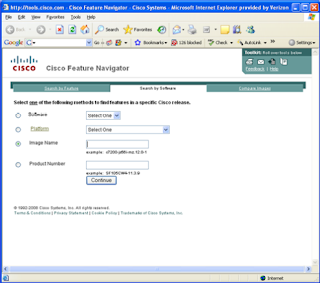
Click on Search by Software to get started. You should see a screen like Figure A:

Figure A

You can now pick and choose which options you want. For our example, we’ll pick the following:

Software: IOS
Platform: 4500
Image Name: c7200-js56i-mz.12.0-1
Product Number: SF105CW4-11.3.9

Click the Continue button when completed.

You’ll see a screen like Figure B.

Figure B


The screen displays all the features that are available for this IOS image. The display also shows you the Release and Product information for that image: No more looking through the release notes and trying to figure out what features are included in your IOS.

Scenario 2: Compare IOS and CatOS image features

Another helpful use is comparing IOS images to see what features are s

upported. That’s handy if you want to update an image on your router. Click on the compare images link. You should see Figure C.

Figure C


(By the way, you might notice that Help is listed right on the screen, so you can readily see what options are required and which is optional.) I have filled in the options for this example comparing Cisco CatOS image to IOS XE image. Figure D and Figure E show the results of that query.

Figure D


Figure E

As you can see, there are a lot of features that are unique to the Cisco IOS XE image. By clicking on each feature link, you can learn the details of that feature.

Now, let’s look at researching by Feature. You can click on the Search By Feature link from the first screen of the Navigator or click on the Search By Feature tab on subsequent screens. This search looks a little different than the others (Figure F).

Figure F


There are a lot of ways to research from this screen. You can search through all features and only add or remove what you are interested in obtaining in a single IOS. Once you select those features, you are told what hardware platform is required, what RAM, what Flash, and what IOS version. You are also given the option to sort these or filter these by, say, the mature and stable releases only.

Conclusion

The Cisco IOS Feature Navigator is an invaluable tool to use for researching anything and everything about Cisco IOS releases, images, and platforms. It can be used to answer questions like, what features does my IOS support, what is the difference between these two IOS versions, and what would be required for me to run the new IOS? You’ll save yourself a lot of time by creating a browser Favorite to the Cisco Feature Navigator.

Posted By David Davis

Five Cisco IOS tips to make you more efficient

Over the years, I’ve offered a ton of Cisco IOS tips and tricks in the Cisco Routers and Switches newsletter. However, some of the best tips are too short to support a full-length article. This week, I want to share five quick tips for using the Cisco IOS that will help make you a more efficient network admin.

#1: Cut yourself off

I assume that just about everyone who uses the Cisco IOS also knows that it accepts the fewest unique letters that represent a valid IOS command. However, I still notice some network admins typing out entire commands or even more letters than they have to.

If you add up all the time it takes to enter those unneeded letters, how much time have you wasted? Here are a couple examples of command uniqueness:

show ip route = sh ip ro
show running-configuration = sh run
show ip ospf = sh ip o

On another note, why not use the shortest command for the job? Instead of using copy running-configuration startup-configuration or even co run start, why not use wr? The old write command actually does the same thing, but it’s a lot fewer characters to type.

#2: Make time work for you

Many times, router events can happen so quickly that multiple events happen in the same second (especially on large routers that have a lot of routes). To make sure your log can tell you exactly what happened at what time, use this command: service timestamps log datetime localtime show-timezone msec year.

This command make sure the router timestamps all of your logging messages with the current time, the time zone (for those of you with remote routers in different time zones), the millisecond that the event occurred, and the year. (For those whose routers don’t usually have many events, it can be nice to know the year.)

Here’s what the timestamp looks like (without the year):

*Oct 21 15:31:54.955 CDT: %LINEPROTO-5-UPDOWN: Line protocol on Interface
GigabitEthernet0/0,changed state to down

In addition, you can use the service sequence-numbers command to include an absolute number that identifies each event and shows the sequence that events occurred. Entering this command tells the router to add a number next to each logging message, which both identifies that event and orders the events by numbered sequence.

#3: Start with a clean slate

Let’s say you’ve configured an interface on your router but later decide that you want to reconfigure it. Without having to remove what you set, command by command, or without having to wonder which commands you added and which were defaults, you can quickly bring a single interface back to its “default” configuration in one command. Just use the default interface command, as in default interface Fa0/0.

#4: Change your filter

If you’re a Linux admin, you know how to “pipe things to more” or “filter with grep,” right? It amazes me when I see Cisco admins who look through a huge running-configuration when they know what they’re looking for.

The next time you’re looking for something in a Cisco IOS command output, use begin or include. For example, to start at the OSPF configuration, use sh run | beg router ospf. Or, to show all IP addresses configure on the router, use sh run | inc ip address.

You can also use exclude. Trust me, there are a million ways to use these command-filtering techniques.

#5: Just do it

How many of you tend go to back and forth from Global Configuration to Privileged Mode to configure things as opposed to show things? (I admit it, I’m holding up my hand.) It’s a habit, right? It’s how we learned to configure the IOS — always changing from “configuration mode” to “show mode.”

It’s time to break that habit and start saving time by using the do command. This command allows you to run Privileged Mode commands from Global Configuration Mode. Even better, it’s short — a whole lot shorter than exiting back to Privileged Mode, entering your command, and then going back to Global Configuration Mode.

All you have to do is use do in front of the command. Using this command, you can perform any exec mode (Privileged Mode) command from any of the Global Configuration Mode prompts.

Let’s say you’re configuring OSPF and want to see if your neighbors came up. Here’s an example:

Router(config)# router eigrp 100
Router(config-router)# do sh ip ei nei
IP-EIGRP neighbors for process 100
H Address Interface Hold Uptime SRTT RTO Q Seq
2 10.1.1.1 Fa0/0 13 00:52:47 88 2280 0 6581

Summary

Finding ways to do your job more efficiently is always important. These five quick tips will help you accomplish the same Cisco IOS tasks you’re already doing — but more quickly and easily by using some Cisco IOS commands that you may not have been aware of.

Posted By David Davis

Saturday, 27 June 2009

Top 10 technical certifications for 2009

A few days ago I stumbled upon a post on About.com which listed the top 10 technical certifications for 2009. The rankings were evaluated according to the website’s visitors feedback, to the profitability and relevancy to today’s market, and from the popularity of the certifications discussed on the site. First on the list is Cisco CCIE. The site provides also an indicative average salary for each certification, which however depends on many factors such as experience, work location, company etc. Let’s summarize the top ten certification list below:

Cisco CCIE: As one of the most difficult certifications to obtain, the CCIE is an excellent credential for a professional. The thriving networking field demands high skilled professionals and the CCIE is the top of the line. Average Salary $93,000.

CISA: The Certified Information Systems Auditor certification from ISACA association is also very popular and profitable. CISA professionals serve the company as Information Systems auditors dealing with security controls and business controls of Information Systems. Average Salary $115,000.

CCSE: The Checkpoint Certified Security Engineer is another high level security certification for professionals working with the Checkpoint Firewall-1 product. Average Salary $90,000

MCSD: This is a Microsoft certification about solution designs using Microsoft products. The Microsoft Certified Solution Developer is expected to know all enterprise Microsoft solutions and use business analysis skills to suggest the best solution for a specific customer. Average Salary $88,000

PMP: Another certification that requires high skills and lots of experience. The Project Management Professional is required to possess extensive experience in project management such as a Bachelor’s degree with 4,500 hours of project management work. Average Salary $101,000.

CISSP: Another security certification in the list shows that security is a hot topic for getting certified in 2009. A Certified Information Systems Security Professional is required to pass a rigorous 6 hours exam (250 questions) covering 10 domains in information security. It is said that the CISSP knowledge is 10 inch deep by 10 miles wide!! Average Salary $94,000.

RHCE: Red Hat Linux is the most popular linux flavor. Red Hat Certified Engineers should possess the skills to configure networking and security on Red Hat OS. The exam is actually a 5-hours hands-on test on configuring Linux. Average Salary $83,000.

SCJP 6.0: This is the Sun Certified Java Programmer certification. Designed for programmers with skills on Java 2 development platform. Average Salary $75,000.

CAPM: This is another project management certification, but less demanding compared to the PMP. The Certified Associate in Project Management requires professionals to possess 1,500 hours of project management experience. Both CAPM and PMP certifications are awarded by the Project Management Institute (PMI) which is a highly respected institution in the industry. Average Salary $75,000.

Cisco CCVP: The Cisco Certified Voice Professional comes as number 6 in latest ZDNET survey for highest paying certifications. Voice over IP and IP Telephony technologies are always hot and should be expanding even more in the future. Cisco holds maybe the top position in IP telephony, that is why CCVP engineers are in high demand. Average Salary $89,000.

Source : Cisco-tips.com

Cisco Revising CCIE R&S Certification

To reflect the growth of the network as a service platform, Cisco is revising the certification requirements for CCIE Routing & Switching (CCIE R&S)–the expert level certification for network engineers. The new requirements were developed with assistance from Cisco enterprise customers and reflect the expectations of employers across industries.

The competencies required for CCIE R&S v4.0 certification were released on May 5, 2009, and are available on the Cisco Learning Network under the CCIE R&S v4.0 Written Exam topics and CCIE R&S v4.0 Lab Exam topics. Exams based on the new requirements are scheduled for release on October 18, 2009, and will immediately replace the currently available v3.0 exams. Candidates who plan to take their exams on October 18, 2009, or later should prepare using the new v4.0 exam topics.

Both the written and lab exams will be refreshed with new questions and will cover MPLS and VPN networking. The written exam will add scenario-based questions to the multiple choice questions, and the lab will now require hands-on troubleshooting of preconfigured networks, in addition to configuration. Exam duration and pricing will remain the same, with the two-hour written exam at USD$350 and the eight-hour lab at USD$1400.

A beta version of the new CCIE R&S v4.0 written exam (351-001) will be available to all customers in the July–August 2009 timeframe at a discounted price of USD$50. An announcement will be made when scheduling begins.

Posted By CiscoTips

Sunday, 21 June 2009

Ethernet Physical Standards

Up to this point we’ve mainly been looking at the Data Link layer elements of Ethernet. However, Ethernet standards also define Physical layer characteristics such as cable distances, media types, and just about anything to do with physical connectivity, including connectors. You may already be familiar with some of the different varieties of Ethernet. They’re usually represented in a format such as 10BaseT or similar. Understanding the designations is critical, so we’ll look at these first.

When you see Ethernet defined as 10BaseT, you’re actually being provided with 3 pieces of information. In this example:

“10” defines the maximum speed of transmission in Megabits per second.
“Base” specifies that baseband transmission is used. Baseband transmission provides a single channel for digital transmission. In contrast, broadband transmission is analog and separates the cable into different frequency ranges or channels.
“T” defines that this type of Ethernet runs over twisted pair wiring. On a 10BaseT network, the minimum cable standard is Category 3.

A variety of different Ethernet standards exist, a cross section of which are outlined below.

10Base2. 10Mbps Ethernet that runs over ThinNet coaxial cable. Maximum segment length of 185 meters and a maximum of 30 connected systems per segment.
10Base5. 10Mbps Ethernet that runs over ThickNet coaxial cable. Maximum segment length of 500 meters and a maximum of 100 connected nodes per segment.
10BaseF. 10Mbps Ethernet that runs over fiber optic cabling for distances up to 2 kilometers in full duplex.
100BaseTX. Fast Ethernet (100Mbps) that runs over Cat5 twisted pair wiring. Maximum cable length is 100 meters.
100BaseFX. Fast Ethernet that runs over fiber optic cabling.
1000BaseT. Gigabit Ethernet (1000Mbps) that runs over Cat5 twisted pair wiring. Maximum cable length is 100 meters.
1000BaseLX. Long wave Gigabit Ethernet over fiber. If using multimode fiber, maximum distance is 550 meters. If single mode fiber, maximum distance of approximately 5 kilometers.
1000BaseSX. Short wave Gigabit Ethernet over fiber. Uses multimode fiber to span distances up to 550 meters.

Ethernet also makes use of features at the Physical layer by auto-negotiating elements such as link speed and duplex type when a network card is plugged into a switch or hub. Originally defined in the IEEE 802.3u specification (Fast Ethernet), this is accomplished using something called Fast Link Pulses (FLPs), which are sent between the system and the connected port. For example, you may have a network card that supports both 10 and 100 Mbps speeds. However, if the hub only supports 10 Mbps, they will negotiate the connection to the common setting (in this case 10 Mbps). The same is true for negotiation of the duplex type used. When using half duplex, a system can be either sending or receiving data, but not both concurrently. In full duplex, systems can send at receive at the same time.

Note that when plugged into a hub, systems will always communicate using half duplex, since they share the media and only one system can communicate at any given time. When a system is plugged directly into a switch port, full duplex becomes possible. To that end, it is worth noting that when you connect a hub to a switch, all computers plugged into that hub will automatically use half-duplex, since they’ll again be part of the same collision domain.

Posted By Dan DiNicolo

How to Configure a Cisco ASA 5510 Firewall - Basic Configuration Tutorial

This article gets back to the basics regarding Cisco ASA firewalls. I’m offering you here a basic configuration tutorial for the Cisco ASA 5510 security appliance. This device is the second model in the ASA series (ASA 5505, 5510, 5520 etc) and is fairly popular since is intended for small to medium enterprises. Like the smallest ASA 5505 model, the 5510 comes with two license options: The Base license and the Security Plus license. The second one (security plus) provides some performance and hardware enhancements over the base license, such as 130,000 Maximum firewall connections (instead of 50,000), 100 Maximum VLANs (instead of 50), Failover Redundancy, etc. Also, the security plus license enables two of the five firewall network ports to work as 10/100/1000 instead of only 10/100.

Next we will see a simple Internet Access scenario which will help us to understand the basic steps needed to setup an ASA 5510. Assume that we are assigned a static public IP address 100.100.100.1 from our ISP. Also, the internal LAN network belongs to subnet 192.168.10.0/24. Interface Ethernet0/0 will be connected to the outside (towards the ISP), and Ethernet0/1 will be connected to the Inside LAN switch. Refer to the diagram below for our example scenario.

The firewall will be configured to supply IP addresses dynamically (using DHCP) to the internal hosts. All outbound communication (from inside to outside) will be translated using Port Address Translation (PAT) on the outside public interface. Let’s see a snippet of the required configuration steps for this basic scenario:

Step1: Configure a privileged level password (enable password)

By default there is no password for accessing the ASA firewall, so the first step before doing anything else is to configure a privileged level password, which will be needed to allow subsequent access to the appliance. Configure this under Configuration Mode:

ASA5510(config)# enable password mysecretpassword

Step2: Configure the public outside interface

ASA5510(config)# interface Ethernet0/0
ASA5510(config-if)# nameif outside
ASA5510(config-if)# security-level 0
ASA5510(config-if)# ip address 100.100.100.1 255.255.255.252
ASA5510(config-if)# no shut

Step3: Configure the trusted internal interface

ASA5510(config)# interface Ethernet0/1
ASA5510(config-if)# nameif inside
ASA5510(config-if)# security-level 100
ASA5510(config-if)# ip address 192.168.10.1 255.255.255.0
ASA5510(config-if)# no shut

Step 4: Configure PAT on the outside interface

ASA5510(config)# global (outside) 1 interface
ASA5510(config)# nat (inside) 1 0.0.0.0 0.0.0.0

Step 5: Configure Default Route towards the ISP (assume default gateway is 100.100.100.2)

ASA5510(config)# route outside 0.0.0.0 0.0.0.0 100.100.100.2 1

Step 6: Configure the firewall to assign internal IP and DNS address to hosts using DHCP

ASA5510(config)# dhcpd dns 200.200.200.10
ASA5510(config)# dhcpd address 192.168.10.10-192.168.10.200 inside
ASA5510(config)# dhcpd enable inside

The above basic configuration is just the beginning for making the appliance operational. There are many more configuration features that you need to implement to increase the security of your network, such as Static and Dynamic NAT, Access Control Lists to control traffic flow, DMZ zones, VPN etc. I just tried to offer you a starting point for a basic configuration from where you can build your knowledge further.

Posted By Cisco-Tips

How to configure Cisco Router with IOS Firewall Functionality – CBAC

For a low budget firewall functionality, a Cisco router with the proper IOS version can work as a network firewall providing stateful protocol inspection using the Context-Based Access Control (CBAC) feature. Many people use normal Access Control Lists on Cisco routers for traffic filtering and protection. However, a normal ACL is just a static packet filtering mechanism and nothing else. With a CBAC configuration, the router acts like a firewall. That is, it inspects protocols and sessions and keeps a state of the connection in memory. This means that an outbound packet (from inside the network to the outside) is inspected and a connection state of the session is kept in memory. The reply packet which belongs to the original outbound connection is allowed to pass through the router/firewall and reach the internal system which originated the connection. This stateful functionality is achieved by the IOS Firewall CBAC mechanism by opening temporary holes on an Access List in order to allow the reply packets.

A normal ACL checks traffic up to the transport layer. CBAC on the other hand inspects traffic up to the application layer to learn about the state of the session and to apply firewall filtering on the specific application. The protocols supported by CBAC for inspection are the following:

CUSeeMe Protocol, ftp, h323, http, rcmd, realaudio, rpc, smtp, sqlnet, streamworks, tcp, tftp, udp, vdolive. CBAC helps to protect also against DoS attacks such as SYN-floods or fragmentation attacks.

CBAC is applied either inbound or outbound on a specific router interface. CBAC applied “Inbound” on an interface inspects traffic entering the interface and CBAC applied “Outbound” on an interface inspects traffic exiting the interface. CBAC cooperates with an ACL applied on the same interface in order to provide the firewall stateful functionality that we described above. Lets see a simple example below.

In the figure above, assume that there is an inbound ACL applied on S0 on the router. The ACL is configured to block Telnet traffic initiated from the outside. Assume also that there is a CBAC rule applied “outbound” on S0. An internal user (User1) initiates a Telnet session from inside to outside. When the connection request for User1’s Telnet session passes through the firewall, CBAC inspects the Telnet traffic when exits interface S0 and creates a temporary opening in the inbound access list at S0 to permit returning Telnet traffic for User1’s Telnet session. (If the same access list is applied to both S0 and S1, the same opening would appear at both interfaces.)

Important Note: CBAC which inspects outbound traffic from an interface, will create temporary openings on the Access List which is applied Inbound on the interface. This is required to allow the return packets to pass through the ACL.

Let us see a configuration example below to get a better picture.

Configuration Example:

Refer to the diagram below for our configuration example:

We have a border Cisco router connecting the internal LAN 192.168.1.0/24 to the Internet. We have a static public IP address 50.50.50.1 on interface Serial0/0. Also, we have a DMZ segment (interface FE0/0) hosting a DMZ Web Server 10.1.1.1. We want to allow access from Internet towards the Web Server only. We use static NAT to hide the Web server private address behind our public address. Also, we use PAT on interface S0/0 for all outbound communication from the internal LAN towards the internet.

Lets see a snapshot of the configuration below:

! Create the outbound CBAC inspection rules
ip inspect name CBAC-IN-OUT tcp
ip inspect name CBAC-IN-OUT ftp
ip inspect name CBAC-IN-OUT h323
ip inspect name CBAC-IN-OUT rcmd
ip inspect name CBAC-IN-OUT http
ip inspect name CBAC-IN-OUT netshow
ip inspect name CBAC-IN-OUT realaudio
ip inspect name CBAC-IN-OUT rtsp
ip inspect name CBAC-IN-OUT sqlnet
ip inspect name CBAC-IN-OUT streamworks
ip inspect name CBAC-IN-OUT tftp
ip inspect name CBAC-IN-OUT udp
ip inspect name CBAC-IN-OUT vdolive

! Create the inbound CBAC to inspect inbound HTTP
ip inspect name CBAC-OUT-IN http

! DMZ interface
interface FastEthernet0/0
ip address 10.1.1.254 255.255.255.0
ip nat inside
full-duplex
no cdp enable
!
! Internal LAN interface
interface FastEthernet0/1
ip address 192.168.1.254 255.255.255.0
ip nat inside
full-duplex
no cdp enable
!

! External Internet Interface
! Notice that we apply an inbound ACL and CBAC rules for both in and out inspection
interface Serial0/0
description CONNECTED TO INTERNET
bandwidth 1024
ip address 50.50.50.1 255.255.255.252
ip access-group FIREWALL in
ip nat outside
ip inspect CBAC-OUT-IN in
ip inspect CBAC-IN-OUT out

ip nat inside source list 122 interface Serial0/0 overload
ip nat inside source static tcp 10.1.1.1 80 50.50.50.1 80 extendable no-alias
ip classless
ip route 0.0.0.0 0.0.0.0 50.50.50.2

! This ACL will be used by the CBAC out rule to open temporary holes for return traffic
ip access-list extended FIREWALL
permit icmp any any echo-reply
permit tcp any host 50.50.50.1 eq 80
deny ip any any log

access-list 122 permit ip 192.168.1.0 0.0.0.255 any

Posted By Cisc0-tips

Point to Point lease line configuration and tips

Point-To-Point Leased Line Implementation

Current configuration:

version 12.0

service timestamps debug uptime

service timestamps log uptime

no service password-encryption

!

hostname A-cisco

!

username B-cisco password 0 Jonn

!

interface SeriaIO/0

ip address 1.1. I.I 255.0.0.0 encapsulation ppp

ppp authentication chap

!

line con 0

transport input none

line aux 0

line vty 0 4

no login

!

end

Current configuration:

version 12.0

service timestamps debug uptime

service timestamps log uptime

no service password-encryption

!

hostname B-cisco

!

username A-cisco password 0 Jonn

!

interface SeriaIO/0

ip address 1.1. I.2 255.0.0.0 encapsulation ppp

ppp authentication chap

!

ip classless

no ip http server

!

line con 0

transport input none

line aux 0

line vty 0 4

no login

!

end


Posted By Computerfreetips

Routing Information Protocol (RIP) Configuration.

RouterA#show ip route

Gateway of last resort is not set

C 1.0.0.0/8 is directly connected, serial0/1

C 3.0.0.0/8 is directly connected, serial0/0

C 192.168.1.0/24 is directly connected, loopback0

Configure RIP on Router A

RouterA#configure terminal

RouterA#(config)#router rip

RouterA#(config-router)#network 3.0.0.0

RouterA#(config-router)#network 1.0.0.0

RouterA#(config-router)#network 192.168.1.0

RouterA#(config-router)#exit

RouterA#(config)#

Now verify these configuration on router A with command us under:

RouterA#show ip route

To check the routing protocol with this command.

RouterA#show ip protocols

RouterB#show ip route

Gateway of last resort is not set

C 1.0.0.0/8 is directly connected, serial0/1

C 2.0.0.0/8 is directly connected, serial0/0

C 192.168.1.0/24 is directly connected, loopback0

Configure RIP on Router B

RouterB#configure terminal

RouterB#(config)#router rip

RouterB#(config-router)#network 1.0.0.0

RouterB#(config-router)#network 2.0.0.0

RouterB#(config-router)#network 192.168.2.0

RouterB#(config-router)#exit

RouterB#(config)#

Now verify these configuration on router B with command us under:

RouterB#show ip route

RouterC#show ip route

Gateway of last resort is not set

C 2.0.0.0/8 is directly connected, serial1

C 3.0.0.0/8 is directly connected, serial0

C 192.168.3.0/24 is directly connected, loopback0

Configure RIP on Router C

RouterC#configure terminal

RouterC#(config)#router rip

RouterC#(config-router)#network 2.0.0.0

RouterC#(config-router)#network 3.0.0.0

RouterC#(config-router)#network 192.168.3.0

RouterC#(config-router)#exit

RouterC#(config)#

Now verify these configuration on router C with command us under:

RouterC#show ip route